


How to use GPG Relay

Email is an everyday means for communication. The need to provide confidentiality and authenticity to conversations is there, and a growing number of users are starting to realize it. Hence this article which will hopefully guide you to start considering it yourself.
The reason my first article is about Evolution is that it was requested. Hopefully I’ll get time to write articles involving other mail clients as well.
If you don’t know the difference between S/MIME and OpenPGP, or want to know more about why you should digitally sign and encrypt emails, please read to my article at http://www.kfwebs.net/articles/article/21
About GPGRelay
GPGRelay is an Open Source transparent proxy that operate between your email client and your email server. This mean that you can use OpenPGP even though your email client doesn’t have support for it directly. The project website is http://sites.inka.de/tesla/gpgrelay.html
Installing GPGRelay
Before installing
Before installing GPGRelay you should have the GNU Privacy Guard installed.
You can download the installation file from GPGRelay’s website. If you want for GPGRelay to handle Secure Socket Layer (SSL), you will also download http://sites.inka.de/tesla/download/OpenSSL-0.9.7e.dll.zip. This is an ordinary zip-file, that can be unzipped e.g. using WinZip. Then you just copy the files into the directory where you choose to install GPGRelay.
The GPG Relay is a simple windows installation file, and is just to double click to install. After installation you will be presented the option to run GPGRelay. If you don’t have a keypair and/or keyring installed from before, you can let GPG-Relay create one for you. If none is detected you will be presented with the following window
Generating a keypair
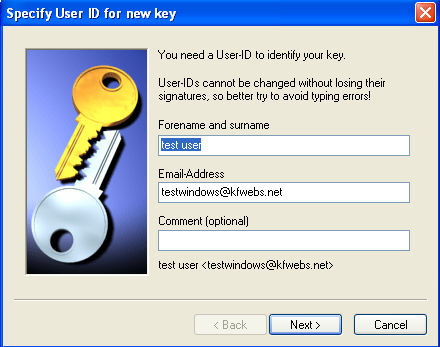
First you just fill in your name and email address, then you press next and is presented with the following window
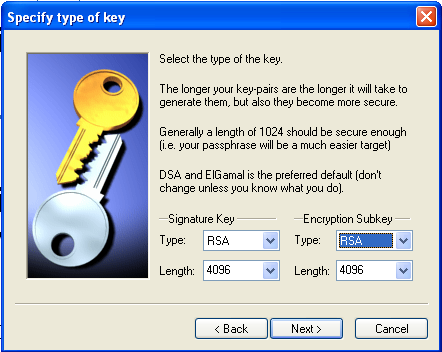
Personally I suggest using a 4096bit RSA signing key, and a 4096 encryption key that either is ElGamal or RSA. Then you just press ok. Note: this probably take some time. In the next two dialogs I set the expiration time to never expire, and use a passphrase for the key. Then you just wait untill it says it is finished generating the key.
Configuring relays
Once completed you are presented with the “relays” window. To understand this, you have to understand the theory of a proxy.
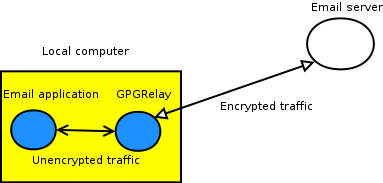
You configure GPGRelay as an intermediare, altering the traffic between the email client and the email server.
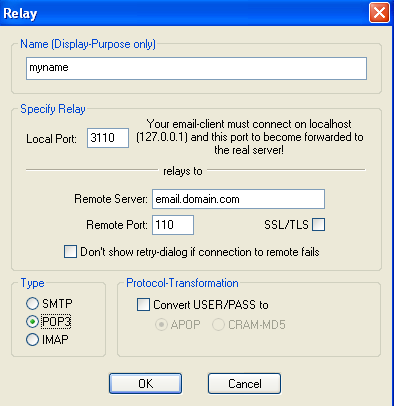
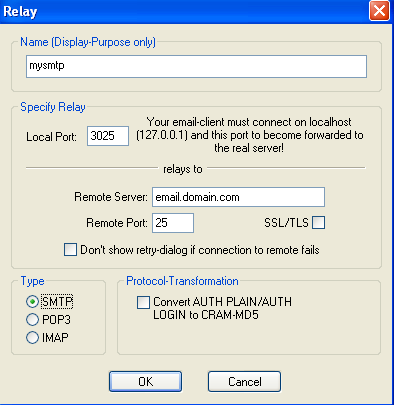
Consider the following example: your email provider use the domain name email.domain.com for both outgoing and incoming traffic. Outgoing (SMTP) port is 25. Incoming (POP3) port is 110. You would in this case add two relays. To do this, press “add”. for the POP you can use name: mypop. and the local port 3110 (you can use the value you want). You would then do the same for SMTP, just alter it to use name mysmtp, local port 3025 and remote port 25.
Configuring the keyrules
The keyrules window look like
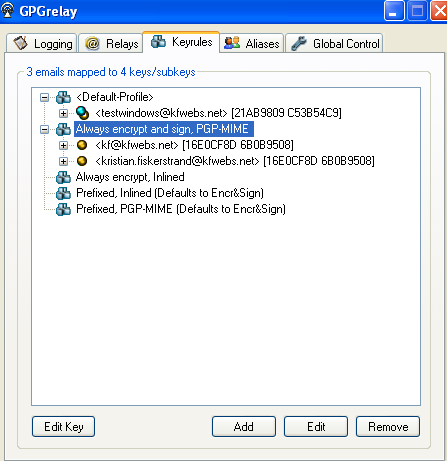
You will notice the key you just generated in the default rule. I suggest editing this rule to always sign the messages. To do this; click edit on the rule, and change “pass-through” to “sign”
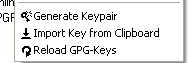
The next thing I did was to edit the rule “PGP/MIME always encrypt”. I changed this to encrypt & sign, and hence also changed the name to reflect this change. After that I imported the key 0x6b9b0508 (my key). This can be found by searching a public keyserver. I used http://keys.kfwebs.net:11371, copied the public-key block and used the import key from clipboard feature
And now I can send secure messages between this computer and my primary computer. More information on configuring GPGRelay can be found at http://sites.inka.de/tesla/gpgrelay_setup.html. If you have any other question, or feedback, don’t hesitate to contact me at http://www.kfwebs.net/contact.php.