


How to use Mozilla Thunderbird

Email is an everyday means for communication. The need to provide confidentiality and authenticity to conversations is there, and a growing number of users are starting to realize it. Hence this article which will hopefully guide you to start considering it yourself.
Mozilla Thunderbird is my primary email client, and Enigmail is by far the plugin I like the most for any mail client related to handeling OpenPGP / PGP/MIME. It will therefore be a fun event to write this article, and if you have any comment regarding it, don’t hesitate to contact me at http://www.kfwebs.net/contact.php
If you don’t know the difference between S/MIME and OpenPGP, or want to know more about why you should digitally sign and encrypt emails, please read to my article at http://www.kfwebs.net/articles/article/21
About Mozilla Thunderbird
Mozilla Thunderbird is the stand-alone email client provided by The Mozilla Foundation. It use XUL for its interface and mbox for storing files on disk. It focus on being small but extensible, and the extensibility support will be important for the rest of this article.
A little rant, although Thunderbird aim at being a small and extensible mail client, it come with native support for S/MIME while not for PGP/MIME, I don’t like this inconsistency, and would like to see the S/MIME part be moved to a module (and updated to handle the newest standards)
About Enigmail
Enigmail is an extension to Mozilla Thunderbird that add support for OpenPGP with the help of GNU Privacy Guard. I have seen this extension mature into a very fine and in my daily routine necessary part of my email experience. I owe a great deal to Patrick Brunschwig, the lead developer, and his development team. The installation instructions can be found at http://enigmail.mozdev.org/gpgconf.html
Using Thunderbird and Enigmail
A signed message
A message that has been digitally signed by me look like
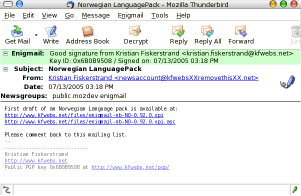

You will see both a color bar at the top with details, green for trusted verified signature, it will be teal if not trusted but valid, and you see the pen icon marking that it has been signed.
A signed and encrypted message
A signed and encrypted message contain both a pen icon and a key icon.
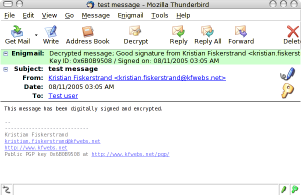
This make it very simple to in a flash see wether a message has been signed and encrypted.
First time use
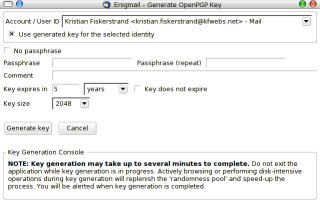 Starting to use Enigmail is very easy, assuming you have gpg installed according to instructions. Enigmail include an own key management feature, and a first-time wizard is in the making. To start using Enigmail you will first have to generate a key. This can be done using the following procedure. Enigmail>OpenPGP Key Management>Generate>New key pair.
You will be presented with the key generation window. Here you can select which account you want it assigned to, and if you want it to be enabled as soon as the key has been generated. We will have a look at the account configuration afterwards. You’re name and email address will be gathered from the account specified. You will and should specify a passphrase for the private key.
I suggest setting the key to not expire. As you get more accustomed to GPG you can change the expiration date of the subkey used for encryption only, while the primary key doesn’t expire. The default setting is a 2048 bit key, which will produce a 1024 bit DSA signing key and a 2048 bit ElGamal encryption key. These are sane settings for most common usage.
Account settings
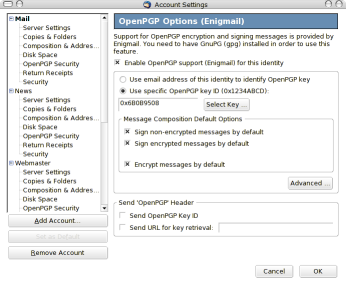 You can access the account settings by right-clicking on an account and select properties. After installing Enigmail you will see an OpenPGP Security entry. I prefer to sign all messages by default and also to encrypt all messages by default. Ordinarily this will pop up a dialog every time you try to send an email to anybody you don’t have a public key for, but we’ll tweak that in the Engimail configurations afterwards.
Enigmail settings
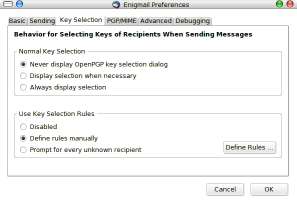 From the previous step we can press advanced to get the Enigmail settings. These can also be found in the Enigmail menu > preferences. In the Key selection tab I prefer to have never show dialog enabled. In addition to the changes in the account settings this will automatically encrypt to everybody you have a public key for, if not, send the email unencrypted without warning.
Retrieving keys
You should now be ready to send signed messages, however to encrypt to anybody else, or to verify a signature you need the other persons public key. If the other user has first sent an email, and the key is on a keyserver this is a rather simple task, involving clicking the pen icon and accepting that it download a new key. If you on the other hand don’t have an email message available you would use the Key Management Window. This is also a very simple task involving opening the key management dialog, selecting keyserver and search for key. Then you can type in the name or email address of the person you want to retrieve the key form and in most cases it will exist
Signing keys
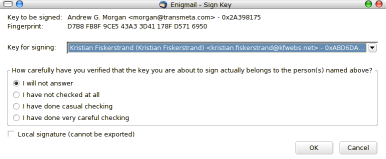 Key signing is vital to PGP. You sign a key to authenticate that you know that the key belong to the person it claim to belong to. The Enigmail key management window provide for an easy way to sign keys. You simply right-click on a key listed and select sign key. You will be met by a dialog allowing you to select which key to use to sign, how carefully you have authenticated the key, and a checkbox where you can mark the signature as non-exportable or local. This implies that the key won’t be sent to a keyserver if you send a key.
Sending and refreshing keys
For others to see that you have signed a key you will need to distribute the altered public key some way (with your signature on it). The most common way to do so is by using a keyserver. To upload a key to a keyserver you merely right click on the key and select upload keys to keyserver.
To refresh a key you will do the same, right clicking and selecting refresh key from keyserver. Refreshing implies downloading the key again so that you can get updated related to the key. New signatures, new subkeys, or in the case the key has been revoked you will be notified. I therefor recommend that you do this once in a while.